Facilier's Talisman From the Princess and the Frog
by world of woodcraft in Craft > Costumes & Cosplay
12052 Views, 273 Favorites, 0 Comments
Facilier's Talisman From the Princess and the Frog
Everyone needs a talisman.. EVERYONE
So why not set to making one.
This one was made within 4 hours and could have probably been made in less time if I had thought about what I was doing first and didn't stop for a delicious cup of tea.
Let me know what you think and I would love to see what you make.
Hopefully i will have made the mistakes so you don't have to.
Scetch Out Facilier's Talisman


Luckily for this project there are some fantastic reference images available online.
Find reference material you like and make a sketch of half of the talisman on a folded peace of paper along the reflective center.
once you are happy push hard with your drawing implement to make a traceable indentation of the half you have drawn and then draw over this indentation.
If all goes right you should have a decent enough plan.
(I don't know how i got it wrong but I did.. I made my initial sketch in accurate which made the later steps a little more difficult until I realized what had happened)
I'm sure you will check your work before going onto the next steps.. (If you can learn from other peoples mistakes then you don't have to make them yourself.. Its an awesome time saver)
Trace Your Sketch Onto the Wood


Cover the back of your sketch with graphite from your pencil.
(This is easier with a softer pencil . I was using HB which is fine for this job)
Tape the sketch graphite side down onto the wood you want to use for your talisman.
(I am using beech because it takes stain well, is not expense and carves like a dream.)
((Its probably worth mentioning I had a nice flat surface,, a ruff surface will not work as well for this process))
Trace your sketch by drawing over your original sketch, this will leave a copy of your sketch on the wood.
Because I know sometimes a light colored pencil line can be difficult to see I went over the sketch on wood with a pen. (this isn't necessary but makes cutting out a little easier)
Cutting Out and Diyeling in


I used a band saw to cut out the shape and refined this with a visit to my sanding station.
I suspect you could do this with a coping saw if you started with a more modest thickness of wood (and didn't have access to a band saw)
Work Out How Thick You Want Your Talisman and Cut It to Width


Work out how thick you want your talisman and cut it to width.
This step can be avoided if you choose wood of a thickness sympathetic to your talisman or re saw your wood to an appropriate thickness before starting (I didn't not think ahead so had to clamp up and cut by hand)
Also I marked the thickness with a peace of paper and a pencil. The correct tool for this would be a marking gauge (I didn't have one handy and didn't need the accuracy so felt the folded paper method would satisfy.
Tape, Tack and Clamp


When carving its a great idea to be able to hold the peace your working on down.
I used double sided tape and 2 1" pins to hold the talisman in place on a scrap board before using some clamps to hold the whole thing to my desk.
Start to Carve


from looking at my reference materials I thought the talisman looked to fit a roughly upside down teardrop shape, near to the shape of niandatal axes (I have to confess I haven't watched the princess and the frog, Just some clips on you tube which looked ace)
With this idea I made the initial cuts shaping the more severe curve of the forehead and then tapering to the chin.
Sand and Mark


I am lucky to have a nice little sanding tool .. sanding by hand takes more time.
When you have a smooth surface you can trace on the details of the talisman again.
Carve the Details Referring to Your Reference Materials


Carve the details referring to your reference materials.
Remember in stage one I told you I had sketched up wrong..
This is where I became aware of that.. When my reference material was different to my sketching .
Incidentally I switched from power to hand tools only for this stage. (I find it gives me a lot more control over the cuts)
My technique is to make a plunge cut from one direction and then work to this cut from the opposite direction (in a similar fashion to cutting blind dovetails with a chisel.
Releece the Beast


Taking the pins out might be a bit of a headache.
I had to carve down a little before I could extract with pliers.
Braking the hold of the double sided tape when the pins are not in place is achieved by twisting the talisman.
Its a good idea to take off the remaining tape from the back of your talisman.
At this point Its nice to check the size and weight ect feel right.. If needed you can put it back on the board for more carving.
Round Over the Edged

Take a little time to round over edges and make sure everything is fine.
Its good practice to inspect your work constantly but building in extra inspection doubles this good practice. I also used sandpaper at this point.. I think the talisman should feel a bit rustic but I hate ruff edges.
Color an Knock It Back


I think the talisman needed a rosewood stain, with its slight red tinge whilst still remaining nice and dark.
I painted on a coat of this stain before knocking it back with kitchen roll. This takes stain away from the highest areas whilst allowing the cracks to be un touched and remain dark.. I further highlighted by sanding some of the stain away from the highest areas.
Put a Hole in Its Head


I used a drill press to create a threading hole, then took care to stain this hole. (again my order is a little off, ideally you should drill before begging staining)
Add a Finish and Buff


I used microcrystalin wax held back for a little while before buffing the talisman. I like this wax.
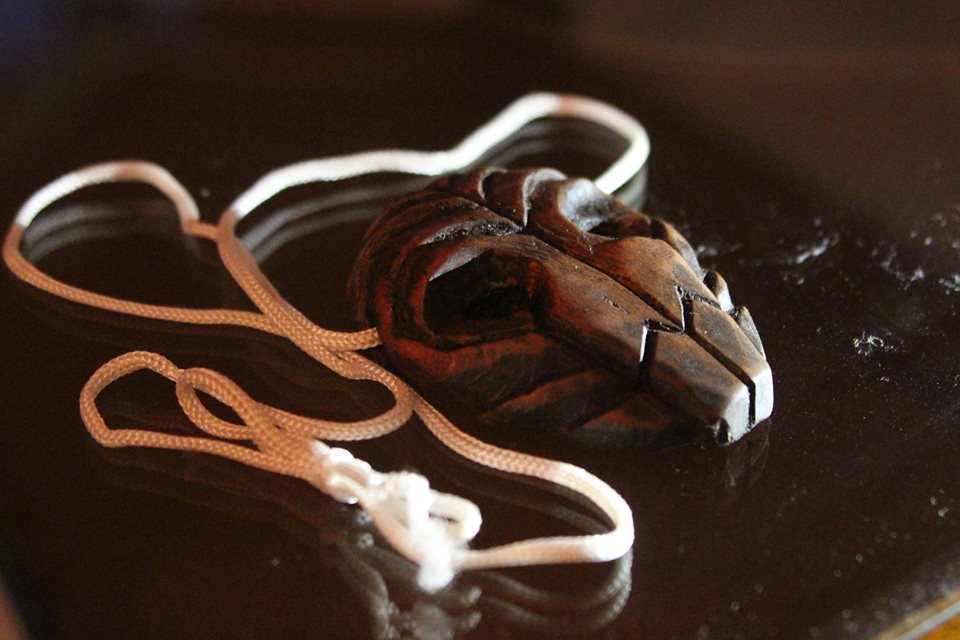
Thread Your Talisman


I find it easier to tape something long and thin to my thread and push it through a hole than trying to push a non ridged string. here i,m using a cotton tip masking taped onto string as a tool.
Tie a Not in the String and Unleash the Power of Voodoo

tie a not in the string and unleash the power of voodoo